Sunday 29 August 2010

It's August, which means that there are social events to attend, the local bike show to go to, and Trev's Seat Toledo to weld up.

The upshot of all that is that I'm usually busy and towards the end of the month, quite tired. So busy and so tired that I haven't had time to get anything done on the BMW, although I think I have decided what I'm doing with the frame.

In the light of all that, and working on the, not entirely unwarranted, assumption that anyone who takes the trouble to read this has at least a passing interest in things relating to café racers and BMWs, I thought that a wander around some of the web sites that I discovered whilst stealing ideas, sorry, "researching", BMW cafe racers on the Internet might be an idea. Had the project followed the original "unbolt some stuff, bolt some other stuff on" premise, then that would have made it simply a procession of adverts for commercial sites that I'd bought my bolt on stuff from. Since, as is the wont of the plans laid by mice and men, that all went wildly awry, then I feel quite comfortable with the idea.

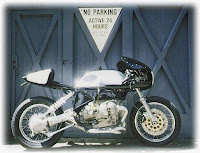
Firstly, there's the TI Boxer. The name is a little deceiving because it's not a titanium BMW, but the Team Incomplete BMW built by Gregor Halenda and friends. There's a pretty good account of the build on the web page, with plenty of explanation of the frame mods, and a wiring diagram. If you've never even seen a picture this motorcycle in passing before then you're in a minority of about 3 people I would have thought. It is a remarkably handsome motorcycle (I know this because a lot of people have remarked on how handsome it is) and I was sorely tempted to copy the exhaust layout right up to the point where I realised I couldn't quite do it by bending tube, and I'd have to buy some mandrel bends if that was what I wanted. If you understood what I meant when I said I wanted to build something that looked like a BMW that was going racing, and not a race bike with a BMW engine, the TI Boxer was probably a major influence on that too.

Over at http://www.rockerboxer.com/ a gentleman known simply as Vanzen has been documenting his BMW café racer build. Apart from documenting his (even more radical) frame alterations, Vanzen has galleries. Around 11 at the last count, each containing something on the order of 30 or 40 images of BMW cafe racers from around the world. This man has a lot to answer for in my book, because it was trawling through his galleries that led me to the conclusion that shifting the engine in the frame was what I needed to do. If it's crossed your mind to buy a BMW and build a café racer, then Vanzen's "Boxers at Large" galleries are an invaluable tool in deciding where you're going with the idea. You might like to show your gratitude by buying a "Disciples of the Luftkopf" T Shirt from him.

That's BMW's, but if you're after cafe racer parts, then there's a name that you may not have heard of, but for the real hardcore, been building these for ages, UK based, cafe racer die hard, it's synonymous with café racers and has been for decades. Unity Equipe in Rochdale. More commonly associated with Tritons, Unity still offer many of the generic café racer parts that used to be common fayre in small motorcycle shops in the UK. Certainly if you're at all interested in café racers you're likely to enjoy leafing through their catalogue which you can download here. If you live outside Europe, bear in mind that the prices in the catalogue include 17.5% VAT (sales tax) which you won't have to pay, making it all quite a bit cheaper than it looks.

Even if you're not thinking about building a café racer (BMW derived or otherwise) there's a fair bit to keep the average enthusiast occupied there. Hopefully, this enthusiast will find the time to finish up the odds and sods related to the seat hump. The other thing that I need to deal with is finding some frame splices. As it stands, changing the oil filter requires that the engine be removed (or at least detached) from the frame, adding some frame splices to make the right hand frame rail removable would make that particular piece of routine maintainence a lot more routine and at the same time would mean that removing the engine was less likely to be affected by any frame stiffening. Attending to the frame is the next major job, and the splices are crucial to the whole thing.

Sunday 22 August 2010

Having established that I'm perfectly capable of letting a week go by without managing anything on the Beemer, and hot on the heels of that establishing that I'm forgetful and easily distracted, then I suppose it behoves me to try and get my act a little more together.

One of the problems with Version 1 of the seat hump was that it didn't really lend itself to any immediately obvious rear light solution. Version 2 more was more or less crying out for a round rear light from the very outset. Despite my avowed intent to spend some money on this build, I still found that looking at motorcycle rear lights induced spasms in my wallet handling muscles when my eye happened upon the price of them. So I bought a Land Rover Series 2 one for an entirely amenable sum that was a little under £8.

Sadly, while the light unit would fit on the flattish part of the seat hump, once again, it didn't really look right. However, mounted on the curved bit of the seat hump, I looked a lot better, but stuck out too far. The obvious solution was to tunnel the rear light into the metal work of the hump, which meant holesawing it in the relevant place. When I turned the hump over, I remembered that I'd marked the centre line of the the centre section of the hump in felt pen, and further more I'd marked the point where it stopped tapering in towards the rear. I spotted all this after I made a wild stab at where the centre of the light should go with one finger, put the finger of the other hand inside the hum and opposite the first finger, and then turned the hump over, to find that the "blind" finger was on the point where the two lines I'd completely forgotten about crossed.

At this point, you might be thinking that was lucky, which in itself was true, but I have to point out that the more I practice, the luckier I get.

Once I'd made a dirty great hole in my new seat hump, I used the same 3 3/8" (I think) holesaw to cut out another hole from some of the 18 gauge steel I'd made the hump from, and kept the "washer" from the middle of the hole. With it firmly clamped down I lined up the pilot drilling and enlarged the hole in the middle with a 1 3/8" holesaw. Once I'd de-burred it, that gave me a base for the light to sit on. then I cut a strip of the 18 gauge that was about 5" wide, and something over a foot long.

Basically, I cut it so that it was wide enough to roll into a tube that disported horizontally would easily fill the hole in the seat hump, and I chose it because it was long enough to wrap round the piece of 3" diameter tube I found for a former. I used the 3" because steel tends to spring back from where it gets bent to, and I wanted a tube that my 3 3/8" washer would sit on the end of. This would form the basis for a plinth for the light, with the rolled tube having the same OD as the light unit's base.

At that point, since it was starting to look like it would all turn out happily in the end, I thought I'd best weld the three pieces of the hump together. I do possess a TIG, but I often can't be bothered to drag it all out of the corner, it costs a bloody fortune to run, and with my dodgy leg I have trouble keeping my body stable enough to do a tidy weld, so I MIG'd the seams by more or less joining up a series of tacks. Not ideal, and while I could have set things a little lower and used short runs of weld, that requires that you don't wobble about while you're welding.

The picture shows the raw, untouched welded seam on the left, and the right hand one has been dressed back flush with a sanding disc on the angle grinder.

Once the seat hump was fully welded and sanded, I took the light mounting I'd made and offered it up to the seat hump to get some idea of where I wanted it to sit. I decided on having the plinth protruding from the hump by what is probably a little less than 1/4". Having thought about how I was going to weld it all together, I cut the plinth off with a hacksaw so that there was about an inch of tube behind the face the light sat on. Then I took the off-cut and cut it down the seam so it would sleeve over the light mounting. I arranged this sleeve so that the open end of the light plinth was flush with the sleeve, leaving the face of the mount sat in the tunnel.

That whole assembly was then inserted into the hump and positioned so that it looked the way I wanted it too and I could mark the "tunnel" to the profile of the hump. Once I'd used the tin snips to trim the tunnel to that line, I tacked it in place and used the sanding disc on the grinder to finesses the edge before fully welding it in place.

By welding the open end of the tunnel and the plinth together, I didn't have a weld bead interfering with the fit where the light mounting face met the side of the tunnel. It might have been better to weld that up prior to welding the tunnel in, but welding it after, although it meant that I could get all the way round the join, meant I could still tweak the amount the the plinth protruded from the hump. With the light mounting dealt with, I folded the "spare" material I'd allowed at the bottom of the hump through 180 degrees and hammered it flat to give the open bottom edges a finished look. I do this on the edge of a flat surface with a pair of Vise Grips, working the lip a little at time and folding it through no more than 30 degrees at a time until it reaches 90 degrees, when it's time to start using the hammer on it. At the corners where I was trying to force a lot of metal into a smaller space and I had the weld to deal with, I folded it over to about 45 degrees, and carefully cut a "V" out of the lip with a hacksaw, taking care to leave enough of the lip to be able to make it fold the rest of the way.

That was, admittedly, a lot of work to mount a rear light, and, let's face it, the whole thing has been a bit of a rigmarole. And at that, it's still not over and done with as I've yet to make the base for the upholstery, make something to keep the worst of the water out of the hump, and work out how to attach all of this to the frame.

But, I think that in the end I managed to make something that looks like it belongs with the rest of the bike. I recently described the idea I have for the bike in an E-mail to someone as "looking like a BMW that's going racing, and not a race bike with a BMW engine". An essential part of that was that the seat unit looked like it belonged on the bike.

As I mentioned, there's a little more fiddling about to do, what with making a seat base, figuring out mountings, and so forth. When that's out of the way, I'll turn my attention to the frame and see if I can stiffen that up a little.

Saturday 14 August 2010

After falling from grace, and not achieving anything last week, I thought I ought to make an effort to do something concrete this week. The obvious candidate for a slapping was the nefarious seat hump, now that I've got the fuel tank located, and made some provision for supporting the seat base at the correct height.

I briefly touched on my idea that the actual metal shaping isn't the hard part of this, and that the real skill lies in conceiving the shape, in a previous post. I also mentioned that I wanted the seat hump to look like it belonged with the rest of the motorcycle.

Given that the motorcycle is German in origin, and that the Germans aren't renowned for their automotive styling, that seemed to offer a clue as to why I felt that the last attempt at a seat hump didn't float my boat. In short, it lacked Teutonicness.

This is what the first effort looked like. On the whole, not offensive, or even particularly unpleasant I feel, but it doesn't seem to belong to the rest of the motorcycle.

It's a bit much to expect to come up with, and then craft, a shape which sat on a shelf on its own would prompt an interested observer to remark that it looked like it belonged on a BMW, but after a while I came to feel that in this case, the observer would be more likely to say something along the lines of "No, what's it for really?" if they were told it was for BMW.


Rather than just remake the hump, I also folded up a new seat base from some 16 gauge steel as getting the tank positioned and the seat height sorted meant that I would have needed to change the shape of the lower edge on the old one, and it was less trouble to make a new one than it was to weld a couple of pieces onto the old one.

Basically, throw it all away, and start again. Not something I like doing, but needs must when the Devil drives. I kept the original steel template I'd made and clamped it back in place for another look. It's shape had been based on the rear of the R80 tank as some sort of start point. The basic premise behind the template was that if it echoed the tank, then it ought to look like it belonged on the motorcycle.

Slightly simplistic you would have thought. What I ended up doing was simplifying it even further by squaring off the back corner of the template so that the lower edge of the hump didn't curve under. Slightly to my amazement, this seems to have worked.With the shaped pieces just tacked together and sprayed black so the hump didn't contrast with the tank, it all looked quite a lot like it might have actually been made by BMW. I left about 3/8" of "spare" along the lower edge so I could fold it back on itself and not leave a raw edge, so the finished result should be a little shallower than the picture shows.

Finally, I'd like to apologise for what I can only describe as the unmitigated asshattery of typing this post and then, for some reason lost in the mists of last week, saving it as opposed to publishing it. Bugger.

Monday 9 August 2010

I have to report, that there is nothing to report this week. That's not to say that I didn't do anything, but that none of what I did do was related to making things happen to the BMW other than in the vague sense that I'm pretty sure how I'm going to wire the lights up now.

Having some sort of a social life doesn't help much either.

Sunday 1 August 2010

Last time, I mentioned making a rear light to suit the seat hump I'd started building and that I didn't really want to do that. With a little more thought devoted to the issue, it turned out that not doing it was a good idea, because the shape of the hump, while quite interesting as a shape, missed looking like it belonged there by a margin of indeterminate, but definite, size. Since it took me most of the week to come to this conclusion, I didn't actually manage to get around to making another one.

In an effort to feel that I'd actually achieved something, I did manage to order a pair of rubber tank mountings for the R80 tank from James Sherlock. That was a bit of a shot in the dark, as I had no idea how the rear of the tank was supposed to be mounted, so the vague hope was that buying the mounting rubbers would make it all clear.

With the rubbers attached to the tank, it seemed fairly obvious that the much longer threaded studs were supposed to go through the frame so I took some 10mm bar and drilled a 6mm hole up the middle of it in the lathe to make some crush tubes. With that done, I put masking tape on the frame, and used a felt tipped pen to mark the positions of the studs prior to drilling some 10mm holes through the frame. With the crush tubes located in the holes in the frame, and the mounting rubbers attached to the tank, it all lined up marvellously.

In the corner of my workshop, there's a UCB, or Ubiquitous Chinese Bandsaw. Mine managed to get buried in a corner sometime ago, and we recently unearthed it. The UCB comes in quite a few guises, and some are better than others, but they all seem to work after a fashion right out of the box. To some degree how happy people tend to be with their UCB depends on what they use it for, if your hobby is making gates and you just want something to cut bar to length while you do something else, it'll probably make you happy. If you're a model engineer and you want to cut bar stock to length before you machine it, I suspect it would start to annoy you very soon. If you're thinking about buying one, or indeed already own one that you're less than pleased with, probably the best thing to do is to type "bandsaw mods" into Google when you've an hour or two to spare.

I used mine to make some risers for the seat base, I took some 2"x 1" 16 gauge (about 1/16" thick) box section and cut it to length, then I used the bandsaw to scallop out the lower edge to form a bridge to go between the seat rails. Aside from looking a little more like someone had thought about it, the scallops allow for missing the rear wheel, and removing the battery. I took the piece I'd cut out of the box section and cut some rectangles out of it to cap the end of the box section with and prevent the supports from lozenging under the weight of the rider.

This is where the seat supports are going to fit. I haven't welded them on yet as I thinking about how the seat hump and the seat proper will attach. Some of the electrical items should ideally be easily accessible, such as the fuses, but with a decent quality gel battery, and provision for charging it in situ, how often do you actually need to take the battery out? With that in mind I'll probably attach the seat base/hump by bolting it on, and have the upholstery separate, and located by a couple of pins and either a thumb wheel, or some poppers around the hump. As long as removing the upholstery lets you get at the fuses and some storage space for a few tools, then that ought to do the job.

On reflection, I should have attended to the tank mountings and the seat base supports before I started messing about with making the seat hump. Trying to make a seat that follows the lines of the tank when the tank isn't in the right place and the seat is balanced on a block of wood, isn't making the task any easier.