Saturday 16 July 2011

Interactive


Quit screwing around...
I've wondered in recent years whats happened to summers. They don't seem to be filled with quite the same sense of being alive that they used to. So, when I spoke to Emily on Wednesday about coming and helping me out, and she had to cry off to go look for some work, I had, an idea. I took the day off, gave her a ride all the places she needed to go, which saved so much time we got to have a couple of hours having a picnic in some woods, by a river. The moral of the story is that sometimes you need to make your own summer memories.

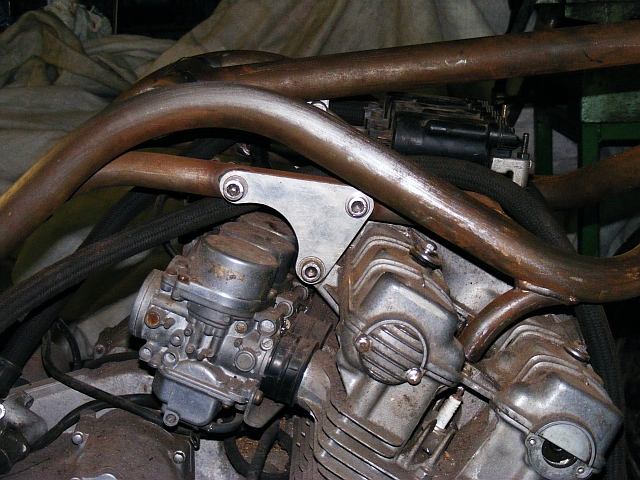
That aside, I had to go and buy some M10 x 1.25mm thread Allen bolts to mount the rear disc on the Kawasaki back onto the rear wheel. You'll notice from the picture it also has enough shank on it that the disc will bear on the shank, and not the thread. The Allen bolt to the left is actually M10 x 1.5mm set screw, and just there for contrast.

I'm nuts about you
On the other side of the rear wheel, I needed to fit the new rear sprocket and wasn't over enamoured of the idea of using the original fasteners. substituting M10 x 1.5mm Allen bolts with plenty enough shank to do the job was OK, but I had to file off one face of some nylock nuts to clear the carrier. no big deal as it meant they'd stay in position without the use of a spanner.


The wheel deal

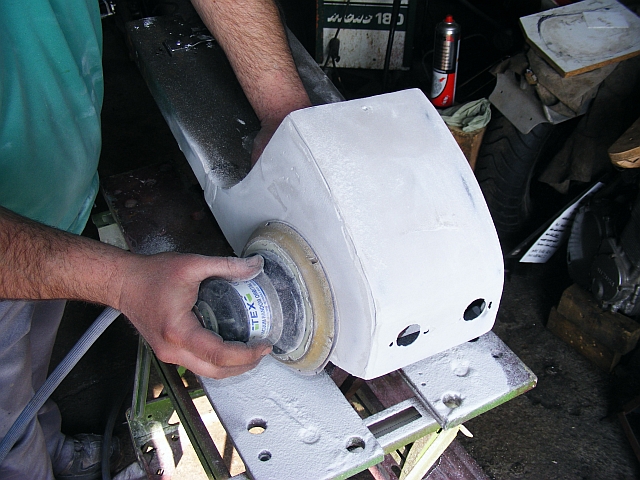
That was the major part of the job, although it involved a certain amount of aerosol action on assorted bits and pieces in an attempt to make things look like some one vaguely cared about it all

With everything aerosoled, replaced, polished, and other wise cosmetically improved upon, I re-inflated the tyre, and sanded the paint off of the edges of the wheel slots in the swinging arm prior to putting  the rear wheel back into the motorcycle.
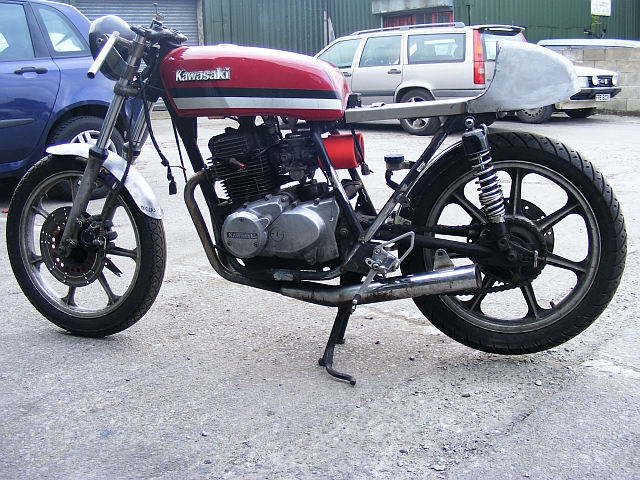
School assembly
On their own, the wheel and the rest of the motorcycle looked a little odd. I'm used to people doubting my colour scheme choices until they see them in the flesh, but this one has had more than it's fair share of detractors. As I slowly add more and more to the motorcycle though I think it's all starting to work quite well. You have to bear in mind that the idea is to make it look like a racing motorcycle and not to make it look like a tart's handbag though...

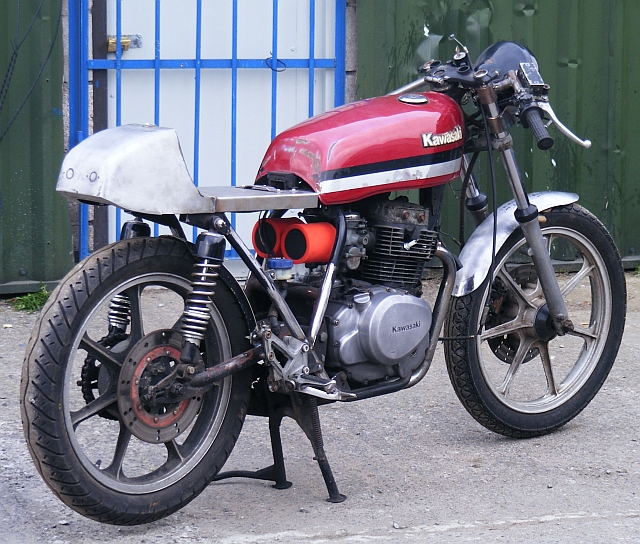
There's still quite a lot to do to it, but once I've finally managed to get the last of the paint off of the front wheel so I can apply a fresh coat and refit it, and Johnny gets the skunk stripe painted onto the body work, we can nail it together and roll it out in the sunshine and see just how well the colour scheme works out.

Monday 27 June 2011

Interspersions

Shiny, shiny,shiny, oh so very shiny
With the engine cleaned, Johnny got hold of a gear change shaft oil seal and I borrowed a seal pick off of Toby and dug the old one out and then fitted the new one using a piece of tube as a drift. That neatly avoided taking the clutch cover off and removing the clutch, so that was a bonus. Since that should persuade all the oil to remain inside the engine, I got on and painted it, and then left it for a couple of days to allow the paint a chance to fully harden.

A bit on the side, so to speak
Getting the engine back into the frame without damaging wither the paint on the frame or the paint on the engine is best done by lying the engine on it's side and lowering the frame over it, since the frame is considerably lighter than the engine. Obviously lying the full weight of the engine on shiny black paint that hasn't fully hardened is going to leave you with quite badly marked shiny black paint. It also helps if you have all the engine fasteners and mounts placed where you can reach them. The frame went over the engine, the studs dropped in with practically no drama at all, and there it was, done.

A fine, upright, citizen once more
In a surprisingly short space of time, the engine was reunited with the frame and stood upright on the box. At this stage it all starts to look like a motorcycle once more, and it becomes easier to raise some enthusiasm for the project. Of course it immediately becomes apparent that there are plenty of other things that need a serious cleaning before they'd look like they belonged on the motorcycle.

Togetherness
My friend Emily came to the workshop in the week and did a sterling job of getting all the old paint, grease and other crap off of the yokes, before she gave them a coat of primer. That meant that all I had to do was blow them over with some gold paint from an aerosol can to match the rear shocks and find the bearings before I could refit them.

Currently I'm trying to get the wheels cleaned up and repainted, along with their discs. I think I'm just going to get a new chain and sprockets since the engine sprocket is worn  to the point the teeth have started hooking, and the rest of it isn't much better. More expense....

Wednesday 8 June 2011

Interests.

Violence. Often the only way.
Having been to the pub, I did eventually turn my attention back to cleaning the Z250 engine. Though, it seemed prudent to remove the remains of the rubber engine mounts prior to investing too much effort in cleaning the engine. The mountings are essentially bits of rubber hose with an inner sleeve at either side of the engine and have a spacer tube between the inner sleeves. Drilling out some of the rubber was a step in the direction of progress, and the journey was completed by the scientific application of "Ingrid", my pet hammer. As you can see, it was just a little rusty in there...

There are whistles that aren't as clean
 Having conclusively proved that the corroded remains of the rear engine mounts weren't necessarily a permanent feature of the engine, then there seemed to be little else to do but to clean it. A can and a half of aerosol engine de-greaser eventually saw most of the grime, grease, and gooeyiness rinsed off, and then it was down to an application of paint stripper to remove the horribly mutilated factory black finish.

You're in the frame for this one...
The Trumpety Springless frame has occupied a little of the intervening time, but vis-a-vis the frame, that's job done now. As I mentioned earlier there may be some minor pedantry involving fitting the twin leading shoe Triumph brake into the Suzuki forks. Though, thinking about it, to call it minor pedantry may be to understate the case some what. We shall see...

Mounted from the rear....
I've been unhappy with the appearance of my welding ever since I got back to it after my accident in 2002. I made a conscious effort not to weld the Triumph frame in a deeply fatigued stupor, and I think it all looks a lot better for it, though sadly it just adds more time to the already extended process. It all drags on for far too long which makes it less than viable as a commercial venture these days.

A little young, but....
In a similar vein, I came to the conclusion that I was never going to have the energy to get my Softail sorted out, and so I sold it  and bought myself a Sportster. It's a 2004 883 of some description, and it now runs, has an MOT, and is taxed and insured. To celebrate, I went out and bought myself a leather jacket, my first since the last one was cut off of me. That's a "vintage", or "second hand" leather jacket, as I'm probably of an age where a recent Harley and a new leather jacket makes you look like you're having a mid-life crisis.

Saturday 28 May 2011

Interlocutory

Stripped and ready for action
If you listen with half an ear, you may be able to hear the grinding noise as the bottom of the barrel is scraped on the "Titles beginning with "inter" " front. It's pretentious, silly, and just a little bit of fun for me at least, but there are only a limited number of words in the English language that begin with "inter" and are even vaguely relevant to the content of the post. It may have to stop quite soon. Try not to be too disappointed?


Not all fiddly bits are for 4 strings.
Word games aside for a moment, I'd like to make the observation that building a motorcycle is in some ways like organising your life. The more effort you put in, and the more attention to detail you pay, the better the outcome. This is probably quite profound, but luckily this isn't a blog about my life, it's a blog about some of the motorcycles in it so we can confine ourselves to considering the assortment of shock absorber related parts that required some attention. The ally top collars (top left) got a visit from the polishing mop, the chrome plated bottom collars (top right) were spoofed back to some semblance of factory freshness by the judicious use of Scotch Brite and fluid from the parts washer, while the two sets of plastic collars were cosmetically improved in much the same way, but with less emphasis on the Scotch Brite and more emphasis on the cleaning fluid.
 
Class of 82 Reunion

Meanwhile, Johnny had painted the springs in the French Blue two pack because we felt that was a little more flexible than the enamel I brushed the frame with. A coat of aerosol satin black on the shrouds, and some Ford Arizona Gold on the shock absorber bodies and I reassembled the whole thing using the shock absorber spring compressor I made a while ago liberally bedecked with rags to stop any of the assorted paint finishes from being blemished.


Shocking the entire assembly...
You might have thought that with everything reassembled, that the shock absorbers could be bolted straight on. That would be to ignore the state of the bolts, and indeed the nuts. It's also ignoring bolting the swing arm in, but that mostly involved grease and a rotary wire brush. The mountings for the shock absorbers utilise the 10mm x 1.25mm thread and not the Euro favourite 10mm x 1.5mm thread. Since all the original fasteners seemed to have been the victims of some sort of systematic fastener abuse, they all looked quite appalling and were replaced with new stainless examples after a quick cross urban dash.

With the frame and swinging arm reunited, and the shock absorbers looking not entirely unlike they might possibly have cost slightly more than they actually did, the next thing to do would be to fit the engine. With that in mind I've started removing the mankiness from it, but I was interrupted by an interesting text message, and as I remarked earlier, much like a motorcycle, one's life turns out in accordance to the amount of effort one puts into the details, so I abandoned the engine cleaning in favour of a visit to the pub, in the interests of attending to the details.

Fickle, that's me. 

Wednesday 25 May 2011

Interruptions.

So, not a café racer then?
I think it's probably fair to say that I have far too many things on my plate and in trying to make some progress on all of them, I end up not making much progress on them. Occasionally, some new thing will inveigle it's way onto the schedule and if that doesn't go swimmingly well, it tends to throw a javelin through the spokes of the wheels of the wagon of progress on other things. The latest exemplar of this phenomena has been a rigid frame for a Triumph unit 750 engine which, predictably, rather more plummeted to the deep end of the pool and sat on the bottom sulking than it progressed swimmingly.

It's got a bronze swimming certificate.
In fairness, the lack of progress had more to do with the words "put those jig spacers in that stainless steel box" apparently meaning something other than "put those jig spacers in that stainless box" in certain local English dialects, and the eventual death of the nut in the tailstock feed on the lathe in the face of decades of neglect and abuse. Luckily, the nut in the tailstock died after I'd made some new dummy bearings to fit the headstock to the post on the jig, which meant that progress was held up as opposed to prevented entirely.

Making a mounting out of a molehill

Eventually, we, or at least Johnny, managed to track down a "little man" who could manufacture a new nut and that was sorted out for a reasonable sum of money.  With the lathe restored to full function we made the rest of the bracketry to retain the engine in the frame, and the Triumph frame is very nearly finished, although there is some muttering about fitting a twin leading shoe drum braked Triumph front wheel into the Suzuki GS550 forks. Luckily, I have a lathe for that sort of thing.


True Blue.
In between episodes of cursing the vagaries of assorted influences, I did manage to find the time to make the Z250 frame shiny and blue, so while progress was limited, there was at least some progress. I don't recall if I mentioned that I dismantled the shock absorbers and sanded all the paint off of the bodies in preparation for a fresh coat of paint. With the frame and swinging arm painted the next logical step would be to re unite them, and for that, I'll need the shock absorbers. Getting them painted and reassembled would seem like an idea in that case....

Who knows, it might even lead to some progress on the bloody thing.


Sunday 1 May 2011

Interval

Towards a brighter future.
One of the differences between the process of building a motorcycle as an average enthusiast, and the same process as portrayed by assorted television documentaries, is that the average enthusiast is seldom working entirely with brand new components. Much like brush painting the frame, using second hand components saves money, but takes more time.  It probably possible to draw up a spread sheet, or write a complex equation to determine whether buying new or adapting used parts is the most economically viable solution for any given set of circumstances. Determining which is going to give the builder the most satisfaction however is a different matter.

Feeling a little blue...

If you recall, the premise behind building the Z250 was to sell it and get enough money in heap to rebuild the BMW engine with less in the way of oil leaks. While that's the object of the exercise, it doesn't mean that the job need lack for satisfaction, but it does mean that I have to keep an eye on my tendency to get too carried away with things such as seat catches. Commercially, the project makes little sense as the retail value of a Z250 Café Racer is going to be somewhat less than the retail value of, for instance, a Z750 Café Racer, but the amount of time and money involved would be the same, or at least very similar, in either case.

Mmm.Shiny.....
Pontifications on the economics of modifying motorcycles aside, the thing needs to be finished so I wet flatted the primer with some 600 grit wet and dry, removed all the paint sludge and flipped the frame over again. Brush painting is often seen as a "quick fix" and if you're slapping Smoothrite all over something without disassembling anything or attempting to remove any rust, dust, grease or oil, it may well be. It would also be completely pointless, as it isn't going to look very nice, or last very long. The object of the exercise here is to spend less money than powder coating the frame would cost, but at the same time maintaining the standard of finish, and as a consequence it all takes rather more time than you might imagine. Applying the colour coat to the frame and swinging arm took nearly two hours and needs to be done in good light. Starting from the top and working down means that the inevitable drips don't land on your carefully applied and laid off handiwork and mar the finish.

Johnny has wandered off with the rest of the bodywork and is applying some paint to that, which could lead you to believe that it might all start to look like a motorcycle again during the next week. However, the engine needs a thorough clean and a new gear change shaft oil seal and the wheels, brakes and forks will all need a little love before they're deemed lovely enough to be re-united with the frame.

Sunday 24 April 2011

Interlude


Blood, Sweat, and Emery Cloth.
The Z250 hasn't made a lot of progress, but that's not to say I haven't done a lot of work on it. I'm not sure if I elucidated on the reasoning behind brush painting the frame? Buying the machinery enamel, a litre of red oxide primer, two brushes, and a litre of white spirit cost something on the order of twenty of our good English Pounds, a little under if I recall correctly. At this point I could have got the frame blasted and started painting it, but I chose to strip the frame by hand to keep expenditure down.


Bottoms up! Literally.
While it certainly did that, it also took up a lot of time, probably three days on the frame alone, and most of another day on the swinging arm and assorted brackets. If your personal situation leaves you with more free time than free money, it's an option worth considering, but it requires a degree of patience as well. Going over the entire frame and making sure that all the grease, oil, rust, and old paint are removed is incredibly tedious, but perfectly doable. And then there's the swinging arm, engine mounting brackets, and rear brake torque arm to do as well.

On the flip side...
Avoiding the temptation to get the brush in your hand and start splashing paint around until the preparation is complete is probably as important as having the patience, or at least being sufficiently obsessive, to remove all the old crud from the frame. When I eventually do start painting the frame, I usually flip it upside down for the first coat of primer. I've found that when you apply paint to frame with a brush, there's a tendency for the bottom of horizontal frame members to either remain unpainted, or play host to large and unsightly runs in the paint. By applying the first coat with the frame upside down I can get a good coat of primer on the parts that are going to be difficult to see with the frame the right way up.  With the frame flipped over and lightly scuffed off for the second coat, it's easy to see where there wasn't a lot of coverage.

I think it's had three coats of primer now, and unless I rub through it in a lot of places when I wet flat it, that ought to do, so with a little luck it ought to be in colour by the end of next week...

Sunday 17 April 2011

Intermezzo

Not entirely unlike a café racer
Well the CBX is gone, and the the Z250 has progressed a little more. I'm quite pleased with the way it looks, so I've gratuitously added yet another picture of it prior to dismantling it in order to finish off trimming the old brackets which we didn't want from the frame and welding the new ones that we did want to the frame. I seem to recall shoving the thing outside and taking some pictures of it on the side stand, but I don't seem to be able to find them, possibly because I imagined the entire episode.

Johnny making it look pretty.
In between rushing around and panicking about all the usual things that I have, or more accurately, choose, to rush around and panic about after the first picture was taken Johnny and I jointly and severally managed to get all the outstanding random bits done and start taking the thing to pieces. Johnny got on with finessing the shape of the body work to ready it for a coat of primer, and I took things off until it reached the stage where the engine needed removing.

"I'm just having a lie down..."

 As is occasionally the case, this proved to be a little less than entirely straight forward, with the two rear engine mounting studs seized into their rubber bushings. Quite why Kawasaki felt the need to rubber mount the bloody thing in the first place is a bit of a mystery, and it's entirely possible that when it's all re-assembled, the engine will be solidly mounted. In order to remove the rear lower engine mounting stud, we laid the motorcycle on its side to facilitate accessing the stud in question with the air hacksaw. An air hacksaw, is a hacksaw powered by compressed air, and not in any way similar to an air guitar just in case you were wondering...

There are easier ways.
With the mounts sawn through and the engine removed from the frame, a few minutes twirling of spanners had the wheels and forks removed too, and shortly afterwards the swinging arm had parted company with the frame too. As I'd decided to brush paint the frame on the Z250, I elected to prepare it by hand rather than having it blasted. While this is a fairly low cost option, it's tedious and time consuming, and has little to recommend it. Possibly the only major benefit over blasting is that as long as you're brush painting the frame, you can't remove paint from any areas that you can't reach to repaint. My point is that hand preparing and brush painting a frame is a possibility, and in fact used to be standard practice, and if you're strapped for cash, may prove to be a viable option. The paint we've got for the frame is a "machinery enamel" which is basically commercially available paint that's suitable for brushing as well as spraying, but can be mixed to match a wide range of colours. What that means is that we could order one type of paint for brush painting the frame, and a second type for painting the bodywork, but have both types of paint supplied in the same colour.

I'm hoping to get the first coat of primer on the frame in the next day or so, and I'll let you know how it goes. 
 

Sunday 3 April 2011

Interminable.

I've mentioned that stuff that I want to do, and stuff that I have to do before, but this CBX diversion is another category, that of stuff that I really ought to do even though I don't want, or have, to do it. In this case, I really ought to do it because I really could do with having the space back. Irritatingly, it's still not quite finished. I say irritatingly, because I am absolutely certain that if one more person tell me that it's taking longer than I thought it would (though "wanted it to" is probably more accurate) because "we all slow down as we get older" I am going to tear their abdomen open with my bare hands and strangle them with their own colon. I'd suspect that my inability to perform at the level I used to is more to do with the new improved leg and it's modified neurology, than it has to do with the passing of years, which I find incredibly frustrating.
Anyway, enough about me. I made the exhaust down pipes in pairs, starting with numbers 2 and 5. That miight seem a bit odd, but with the layout I used, 2 and 5 run behind 3 and 4, with the latter pair meeting underneath the former, much like a conventional 4 into 1 system. The remaining two pipes (1 and 6) I routed to run halfway between the levels of the other four pipes. Then I cut half a dozen two and half inch lengths of inch and five eighths tube to start making the collector. To seal the diamond shaped central hole, I used a 20mm long piece of 20mm wide 3mm steel strap, and the triangular holes were filled with weld.

Once the front of the collector was made, it was a fairly simple matter of making a card template for the rest of the collector body, welding that together, and cutting the downpipes to the same length. I got as far as bending up a tail pipe for the systyem and tacking it in place before deciding that I was too tired to start making the exhaust can, and going home. In an ideal world I'll finish that on Tuesday and with a modicum of luck, it'll be gone by the end of the week leaving me with a little more space to work in.

The idea then is to work on the Z250 in that space, and once that's done it can be sold to fund the purchase of the parts for the R65 engine. There are times when it feels like there's more juggling going on in that workshop than there is in the average three ring circus....

Monday 21 March 2011

Intermission.

There isn't enough space anywhere to make a start on the BMW engine, so aside from the Z250, I've been trying to move out some of the more permanent fixtures around the place. Currently that means I'm kicking bits of this Honda CBX 1000 around the floor of the workshop.

 It needed some welding finishing off on the frame and swing arm, some mounts making for the Harris rear sets, the oil cooler, and the coil pack, and a caliper carrier for the Billet rear caliper. 


The other major task is to make a 6-1 exhaust for it in mild steel, but I'll need to get it up on its wheels before I can do that, which in turn means finishing off the caliper carrier.

There's not a lot more to say about it really, so here are some more pictures.


Sunday 6 March 2011

The Pace of Progress.

Well, not quite everything that needed making, got made. But a surprisingly large amount of it did. as well as having all the necessary bits and bobs in the bum stop to secure the battery, the GPX 600 rear sets are attached to the frame, half of the R65 front mudguard is doing service as a rear wheel hugger, and there's a home for the rear brake fluid reservoir and a bracket for a strap to support the tail end of the two into one exhaust. There's also a front mudguard blade, but no stays. That particular item did get away from me a little, is the second attempt and did take entirely too long.

The side stand and its vastly overcomplicated, American proof, mechanism for preventing you from riding off with it still disported, got in the way of the rear set position, so it's been temporarily removed pending it's reattachment where it won't obstruct the gear change. The vastly over complicated etc. mechanism, is unlikely to survive the transplant I fear. We also need to do something about providing bracketry for assorted electrical items that the motorcycle needs either to function or to pass an MOT. Since the carburettor mouths turned out to be the same diameter as those on the BMW, the BMW's air filters were requisitioned, and a fresh set ordered.

Next week is a week where I'm going to have to turn my attention to the ongoing stuff that I have to make some sort of progress on, but I ought to be able to squeeze in a moment of two to get the side stand welded back to the frame and all the stuff that's tacked on, welded on so that the frame an swinging arm can have the remaining stumps of unwanted bracketry shaved off of them along with the rust, grease and traces of paint that adorn them in readiness for a fresh coat of shiny, very nearly, Moriwaki Racing blue. I'm going to have to make a mounting for the GPX 600 rear caliper that we've elected to use, simply because the original one had a seized bleed nipple, the bum stop needs drilling for the newly arrived rear light, and it's going to need a mounting bracket for the Acewell speedo/rev counter, assuming I can ever get enough money to sit still for long enough to buy one of the sodding things.

All in all, it's coming along. 

Sunday 27 February 2011

Origins.

That's another week slipped by with no progress on the BMW. Part of the problem is that what I really ought to be doing is pulling the engine apart and sorting that out, but I've got in such a mess that I don't have enough clear bench space to work on it. Not in itself a major problem, except that I still seem to be rushed off my feet with other things that need to be done and can't find the time to tidy up benches..

I needed some sort of plan to get on top of the situation, and getting stuck into last week's Z250 seemed like an idea. Getting it done and dusted would leave me with enough material to deal with several installments of "things that I have to do", enable me to march it on to a new home to make some space in the workshop, and fund some of the parts for the BMW engine rebuild. Rather neatly, the scheme would seem to afford me a little more time to spend tidying benches too.

With that in mind, Johnny and I spent Tuesday rounding up a collection of surplus aluminium wheels and hauled them off to the scrap yard where we exchanged them for coin of the realm. With that done, we then set about the Kawasaki with a will and an assortment of spanners. The operational brief was to remove everything and anything that didn't look like a café racer, and in fairly short order, we'd achieved that goal.

We gave some brief consideration to using the factory tail piece in place of a bum stop, but by the following morning, had gone off of the idea. The original idea of "unbolt some stuff, bolt some stuff on, café racer!" still held a lot of appeal, but researching the cost of the bolt on bits has led me to the conclusion that it is just cheaper for me to make them myself. Wednesday's flurry of activity saw the motorcycle equipped with a pair of clip ons and some head light stays that I'd made. That was somewhere between £60 and £200 I hadn't spent.

On the way in that morning I'd purchased a 2 metre by 1 metre sheet of 18 gauge CR4 steel sheet, and before I buggered off for the day, I cut out and bent a base for the bum stop. The plan being to house the battery in the hump, I offered a battery up and drew out a card template for the profile which wasn't dissimilar to the original effort for the R65.

Because I'm used to working with older motorcycles, it seems that I've missed out on what's current on the battery front. After some poking around and looking at battery prices, it appears that the YTX-9 BS of recent years is actually cheaper to buy than the older sizes I tend to think of, presumably because they make so many more of them these days. While I hadn't thought to check on the price of them, I did have a dead one floating around, so that got pressed into service while I worked on the bum stop.

Close of play on Friday saw the bum stop made, the frame trimmed and thing mounted to the frame. Johnny had been trawling E-bay and managed to track down a right hand GPX 600 rear set assembly complete with master cylinder and caliper for an affordable sum. The obvious drawback of only having one being alleviated by the presence of a left hand GPX 600 rear set in the workshop.

Come Saturday, I set about making a seat base and it's mountings. You might recall that this took quite some time on the BMW, in which case you'll be pleased to know that I avoided the temptation and settled for a piece of 2mm aluminium bent to follow the bum stop, located by a tongue and hook set up at the front and secured by a single bolt on top of the hump at the rear. Not only did I decide to settle for it, I made it all too, including drilling the holes for the rivets to hold the cover on. I gave some thought to making a start on making a front mudguard for it, but decided that could wait until next week.

Hopefully, I should have everything made by the end of next week and then Johnny can set about making it shiny.


Sunday 20 February 2011

Simplicate, and add lightness.

 Sound engineering advice, which I read somewhere originated with Phil Irving (Vincents), but on Googling the phrase it seems to be attributed to quite a lot of people including Colin Chapman (Lotuses), but probably originated with William Bushnell Stout who amongst other things designed the Ford Tri Motor. I mention it as I'm finding life in general and complex and gloomy at the moment, so I'm toying with the idea of applying it to my life. With that in mind, I've embarked on a campaign to chuck out a lot of the crap in the workshop, especially crap that's not actually my crap. Hopefully that'll leave me a little more room to do do some actual work.

 Speaking of "actual work" I recently bought this Z 250 with a view to making it the basis for a project of the "things I have to do" nature. given that it runs and has brakes, it's not a million miles away from being MOT able. I was looking for something to build a quick, easy, Brat style bike out of, but while the Zed ticked a lot of boxes, it doesn't really have the makings of a Brat style bike (or at least a quick, easy one) in my eyes. So I decided to café it instead...

You know, you unbolt some stuff, you bolt some other stuff on, et vóila, a café racer.  Which all sounds horribly familiar to me as well, and I sat down and had a fairly serious talk with myself before deciding that since this was "stuff I have to do" and not "stuff I want to do", there wasn't a lot of danger of my losing sight of the "quick and easy" part of the equation. Having nipped off and bought the thing, it wasn't until Johnny and I got it back I spotted the tax disc and it's expiry date. You might be wondering just what the bloody hell the significance of that is, in which case, have a look at the second picture in the very first post in this Blog.

What I have in mind for the Kawasaki is exactly what I initially had in mind for the BMW before I got carried away with it all. Aside from from doubts about the fork legs, a days fettling, a days cleaning, and a seat cover would make the Zed a reasonably presentable motorcycle. That makes it a much more sensible basis for a project than the Beemer was and that ought to keep it from becoming a fixture in the workshop.

When I wasn't touring the country collecting motorcycles, I was beavering away trying to catch up with myself in order to get some writing writ in time for the dead lines, or at least before everything buggered off to the printers. Come Saturday, traditionally a day for spurts of progress in the Airhead department, the workshop was in more of a mess than usual, and due to the arrival of the Kawasaki and Johnny's bike trailer, looking even more crowded than usual, so I re-arranged things slightly to give a little more space, by the simple expedient of dragging everything out in the yard, and only dragging the stuff that was mine back in from the yard.

Since I haven't done anything on the BMW in the preceding two weeks, I was determined that something was going to get done and had thought I might make a tray for the fuse box, and any relays to sit between the seat unit mounts, and then cut a hole in the base of the seat unit to allow access to them, which was the whole point of making the seat catch if you recall. Since I don't have a fuse box in the end I gave that a miss as I want the box to be of a depth that suite the fuse box and/or relay mounts. A browse of the Vehicle Wiring Products and the purchase of some bits and bobs is probably in order before I start making anything. As a result, the "something" I managed to do turned out to be making a the stupidly small spacer to allow the Rose joint on the gear change linkage it's full range of movement without it fouling on the gear change lever. One tiny little spacer in three weeks, that makes taking four weeks to mount the seat base look positively rushed...